
Quick Intro
The purpose of this document to show the reader how to build an ATLAS 10 display plugin using the public Client.Platform and Client.Presentation ATLAS API. It is consisted of two parts, a Hello World and a Hello Console plugins. It is highly recemented to start with order presented.
Tutorial 1 – Hello World
In this section we will talk you through on how to build and deploy an ATLAS 10 display plugin using the public Client API. The final outcome would be a Hello World display plugin that can be launched within ATLAS 10. The purpose is to demonstrates the constituent blocks of building a plugin.
Atlas 10 client utilises a modular architecture with the help of Autofac MEF to extend its capabilities.
Prerequisites
- ATLAS 10
- Visual Studio 2015
- .NET C#/WPF
- Display icon. A 16x16 png file (preferably non dark colors)
- Project References
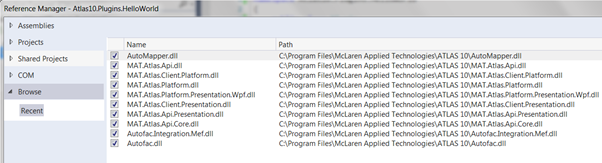
Fig 1: Atlas installation directory: ‘C:\Program Files\McLaren Applied Technologies\ATLAS 10’
Collaterals
- Visual Studio project Plugins.HelloWorld
Steps
- Create a new Class Library project for the plug-in (.NET4.6.2)
- Open the new project's properties
- On the Application page, open 'Assembly Information...' and set 'Title' and 'Description'
- Title: Appears as display window title
- Description: Appears as icon tooltip

Fig 2: Project Assembly Information Dialog
- Add Autofac references using NuGet Package Manager or directly from ATLAS installation directory
- Make sure the version is consistent with the one used by the application; right click on Autofac dlls from inside installation directory to find out the version number
- Create a Plugin class (derive from MAT.Atlas.Client.Platform.Plugins.AtlasPlugin)
- Create a PluginModule class (derive from Autofac.Module)
- Decorate the class with [Export(typeof(IModule))] attribute
- Create a new view (WPF UserControl) e.g. HelloWorldView
- Make sure you add these system references:
- System.Xaml, PresentationCore, PresentationFramework, and WindowsBase
- Create a new view-model class (derive from MAT.Atlas.Client.Presentation.Displays. DisplayPluginViewModel) e.g. HelloWorldViewModel
- Add to the project the display's 16x16 icon as a png file e.g. [plug-in project's path]\Resources\Images\[icon filename].png
- In the image's properties, set its 'Build Action' to be 'Resource'

Fig 3: Project Structure (Visual Studio Solution Explorer)
- Go to PluginModule and override the void Load(ContainerBuilder builder) method. For the ContainerBuilder passed in:
- Register the Plugin as an implementation of IAtlasDisplayPlugin
- Register the new view and view-model

Fig 4: PluginModule.cs
- Go to Plugin and define display’s view, view model and icon using the class attribute: MAT.Atlas.Client.Presentation.Plugins.DisplayPlugin. Also, the plugin calss must inherit from MAT.Atlas.Client.Presentation.Plugins.DisplayPlugin base class.
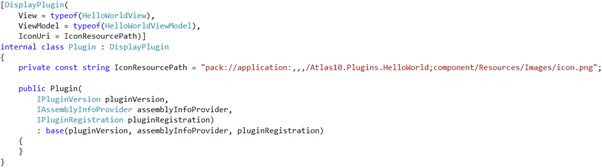
Fig 5: Plugin.cs
- (Optional) Go to HelloWoldViewModel and define the maximum number of parameters using MAT.Atlas.Client.Presentation.Plugins.DisplayPluginSettingsAttribute attribute
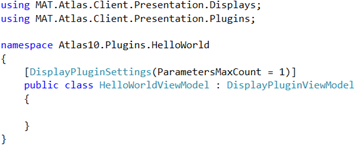
Fig 6: View Model class
- Go to HelloWorldView.xaml and add the UI elements e.g.
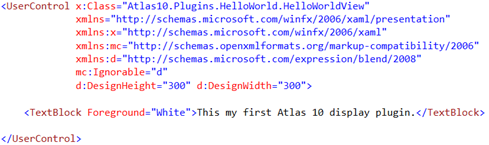
Fig 7: View class
- Build the project under Release configuration
- Copy and paste the Atlas10.Plugins.HelloWorld.dll in the Atlas 10 installation directory under ‘C:\Program Files\McLaren Applied Technologies\ATLAS 10’
- Note: if you have the right permissions use the following post-build command:
- xcopy /Y "$(TargetDir)$(ProjectName).dll" "C:\Program Files\McLaren Applied Technologies\ATLAS 10"
- If you do not have the correct permissions, download the elevate command from the attachments and change the post-build command to:
- C:\Temp\elevate.exe -c C:\Windows\System32\xcopy.exe /Y "$(TargetDir)$(ProjectName).dll" "C:\Program Files\McLaren Applied Technologies\ATLAS 10\"
- Run ATLAS 10 and launch the plugin by clicking its icon from the tool bar

Fig 8: Atlas 10 Toolbar (click the first icon; cogs)
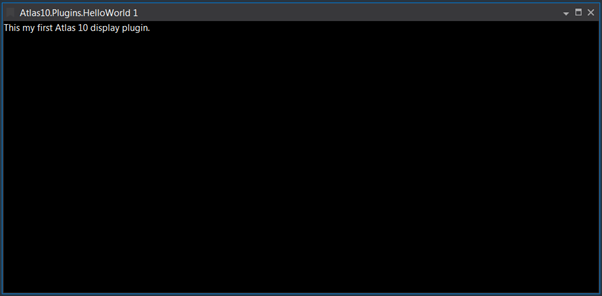
Fig 9: Hello World Display
Tutorial 2 – Hello Console
In the previous section we demonstrated how to build and deploy a simple A10 display plugin using the client API. This tutorial assumes you have completed the first part as we will extend the functionality of the empty Hello World display to demonstrate the following:
- Load a session(s)
- Add parameter(s)
- Respond to time line changes
- Make data requests
- Add display properties
Prerequisites
- ATLAS 10
- Visual Studio 2015
- .NET C#/WPF
- Complete Tutorial 1 – Hello World
Collaterals
- Visual Studio project Atlas.Plugins.Tutorials.HelloConsole
Steps
- Create an empty plugin based on Tutorial 1

Fig 1: Project Structure (Visual Studio Solution Explorer)
- Go to the display’s view model i.e. HelloConsoleDisplayViewModel and inject the following dependencies:
- ISignalBus: It is a cross application message bus. In this case it is used to send data requests and receive data results. It could also be used for cross module communication. The signal bus works with signals that comply to the MAT.Atlas.Api.Signals.ISignal interface. As shown below the display should subscribe to a certain signal type in order to receive back data result otherwise the result signal will be forwarded to every subscriber to the same signal.
- IDispatcherSchedulerProvider: WPF elements have thread affinity and must be modified within the main thread (UI thread). It is recommended to use this interface to update UI elements and still maintain a responsive user experience.
- IDataRequestSignalFactory: This factory is used to create data request signals to be posted on the signal bus.
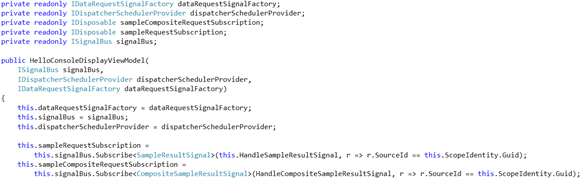
Fig 2: HelloConsoleDisplayViewModel dependencies
- To listen to session loaded/unloaded we add the following events. Whenever a user adds/removes a session via Session Browser to a compare set, the framework will invoke the OnCompositeSessionLoaded & OnCompositeSessionUnLoaded methods with the pertinent event arguments referring to the session dragged into the compare set.

Fig 3: Session events overrides
Note: ActiveCompositeSessionContainer Is the compare set object that encompasses session objects.
- Set the maximum number of parameters a display can handle. The default value is zero and the recommended maximum limit is 100. This is achieved by using an attribute.

Fig 4: Set maximum number of parameters
- Whenever a parameter is added or removed via Parameter Browser or programmatically, the display receives the following events.

Fig 5: Parameters event overrides
- In Atlas every time the session time range changes either by clicking the F1 Timeline or during a Live/Historic replay session, every display gets notified about it.

Fig 6: Project Assembly Information Dialog
- Inside the above event override we will make a data request for the present time range covered by the session. First we have to create the data request signal. The Atlas API supports multiple types of data requests, however, here we show how to retrieve the actual data per sample per parameter. Alternatively, use CompositeSampleRequestSignal for fetching data for every parameters per session.

Fig 7: Data request signal
A quick explanation on the arguments passed to the signal factory above:
- 1st: is the id of the display instance per page and it is used to return the data result signal to whoever issued the request i.e. the same display
- 2nd: the session to read data from
- 3rd: The parameter interested in reading its data
- 4th: a time range within a session to fetch data sample
- With every data request we should expect a data result signal back. In point 2 we showed how to subscribe to our own data result signal. The payload of the signal knows about the data result and its request. The code snippet below shows the result signal handler.
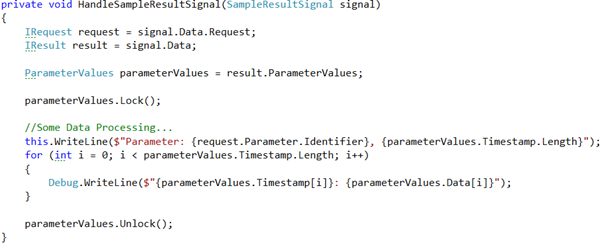
Fig 8: Handle data result
Note: The reason we lock data result object is to allow SQLRace to better optimize memory usage. Hence, the data result should be locked for the time needed and unlocked at the end.
- Finally, you can show/read/save display properties on the region on the right of the docking area related to the display. Any public .NET property in the view model must be decorated with [Browsable(false)] to hide it from the display properties grid as shown below.
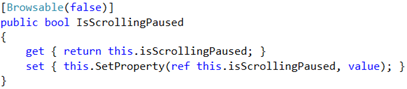
Fig 9: Browsable false

Fig 10: Display properties
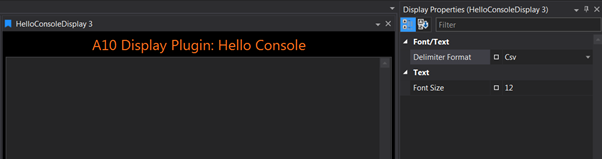
Fig 11: Display properties view
Appendix
A. Session Parameter Objects Relation
The diagram below describes the relation of session and parameter objects in ATLAS API.
- ICompositeSessionContainer: It is the compare set containing the session dragged into it.
- CompositeSession: Actual data session
- Session: Denotes a nested session stricture; a child session of CompositeSession (if available)
- IParamContainer: a parameter set per session
- IParameter: the parameter within a parameter container related to a CompositeSession.
- CompositeSession: Actual data session

Comments
0 comments
Please sign in to leave a comment.